Installing Android Studio
Android Studio provides everything you need to start developing apps for Android, including the Android Studio IDE and the Android SDK tools.
If you didn't download Android Studio, go download Android Studio now, or switch to the stand-alone SDK Tools installinstructions.
Before you set up Android Studio, be sure you have installed JDK 6 or higher (the JRE alone is not sufficient)—JDK 7 is required when developing for Android 5.0 and higher. To check if you have JDK installed (and which version), open a terminal and type javac -version. If the JDK is not available or the version is lower than version 6, download the Java SE Development Kit 7.
[ Show instructions for all platforms ]
To set up Android Studio on Windows:
1. Launch the .exe file you just downloaded.
2. Follow the setup wizard to install Android Studio and any necessary SDK tools.
On some Windows systems, the launcher script does not find where Java is installed. If you encounter this problem, you need to set an environment variable indicating the correct location.
Select Start menu > Computer > System Properties > Advanced System Properties. Then open Advanced tab > Environment Variables and add a new system variable JAVA_HOME that points to your JDK folder, for exampleC:\Program Files\Java\jdk1.7.0_21.
The individual tools and other SDK packages are saved outside the Android Studio application directory. If you need to access the tools directly, use a terminal to navigate to the location where they are installed. For example:
\Users\<user>\sdk\
Android Studio is now ready and loaded with the Android developer tools, but there are still a couple packages you should add to make your Android SDK complete.
Adding SDK Packages
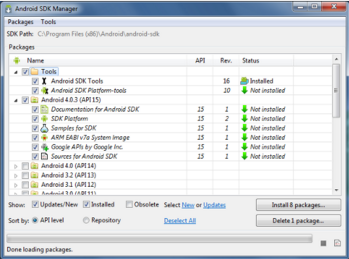
By default, the Android SDK does not include everything you need to start developing. The SDK separates tools, platforms, and other components into packages you can download as needed using the Android SDK Manager. So before you can start, there are a few packages you should add to your Android SDK.
To start adding packages, launch the Android SDK Manager in one of the following ways:
• In Android Studio, click SDK Manager in the toolbar.
• If you're not using Android Studio:
o Windows: Double-click the SDK Manager.exe file at the root of the Android SDK directory.
o Mac/Linux: Open a terminal and navigate to the tools/ directory in the location where the Android SDK was installed, then execute android sdk.
When you open the SDK Manager for the first time, several packages are selected by default. Leave these selected, but be sure you have everything you need to get started by following these steps:
1. Get the latest SDK tools
As a minimum when setting up the Android SDK, you should download the latest tools and Android platform:
1. Open the Tools directory and select:
- Android SDK Tools
- Android SDK Platform-tools
- Android SDK Build-tools (highest version)
2. Open the first Android X.X folder (the latest version) and select:
- SDK Platform
- A system image for the emulator, such as
ARM EABI v7a System Image
2. Get the support library for additional APIs
The support library is required for:
- Android Wear
- Android TV
- Google Cast
It also provides these popular APIs:
- Navigation drawer
- Swipe views
- Backward-compatible action bar
The Android Support Library provides an extended set of APIs that are compatible with most versions of Android.
Open the Extras directory and select:
- Android Support Repository
- Android Support Library
3. Get Google Play services for even more APIs
The Google Play services APIs provide a variety of features and services for your Android apps, such as:
- User authentication
- Google Maps
- Google Cast
- Games achievements and leaderboards
- And much more
To develop with Google APIs, you need the Google Play services package:
Open the Extras directory and select:
- Google Repository
- Google Play services
Note: Google Play services APIs are not available on all Android-powered devices, but are available on all devices with Google Play Store. To use these APIs in the Android emulator, you must also install the the Google APIs system image from the latest Android X.X directory in the SDK Manager.
4. Install the packages
Once you've selected all the desired packages, continue to install:
0. Click Install X packages.
1. In the next window, double-click each package name on the left to accept the license agreement for each.
2. Click Install.
The download progress is shown at the bottom of the SDK Manager window. Do not exit the SDK Manager or it will cancel the download.
5. Build something!
With the above packages now in your Android SDK, you're ready to build apps for Android. As new tools and other APIs become available, simply launch the SDK Manager to download the new packages for your SDK.
Here are a few options for how you should proceed:
Get started
If you're new to Android development, learn the basics of Android apps by following the guide to Building Your First App.
Build for wearables
If you're ready to start building apps for Android wearables, see the guide to Building Apps for Android Wear.
Use Google APIs
To start using Google APIs, such as Maps or Play Game services, see the guide to Setting Up Google Play Services.


0 comments
Post a Comment